


Qld spring holiday closure: Kings birthday long weekend (Thurs 2nd - Mon 6th October)
Kaabo Spares
eScootNow holds a selected range of commonly required Kaabo factory spare parts for Mantis and Wolf Warrior series. Our range will increase through late 2025 as a result of Scooter Hut pulling out of the market that served the Australian region. Essentially if an item cannot be sourced from eSN (or potentially iScoot), AliExpress is the only other sourcing option (always check multiple AliExpress seller listings to validate the spare part is appropriate).
Browse product categories:
Reference materials.
Kaabo communications / signalling protocols across display variants guidance from eSN Facebook page post.
Kaabo's inaugural displays were the LT01 and EY3, with TFT introduced on Wolf Warrior GT Series and in 2024 the KM-03 central display on Plus badge of Mantis X and CM06 which is common on entry level Mantis 2025 models.
 The TFT (portrait) has 3 protocol variants: TFT (Wolf Warrior GT), K2 (Wolf X GT / Mantis King GT) and special variant for Wolf King GTR. Often called IPS due to panel.
The KM-03 central display (landscape) supports both TFT and K2 protocol (universal apparently). Integrated NFC. Introduced on Plus badge of Mantis X.
The Kaabo CM06 (monochrome). Integrated NFC. Available in two protocol variants (LT01 AKA K1 and K2). This display is common
Often alternative main line and controllers are required to retrofit, along with firmware / default voltage there is also the 1385 designation. Kaabo's guidance.
 Notes: TFT vs K2 has prefix designation on controllers. KM-03 lacks advanced assist modes of TFT. In addition to the black SM and White XH there is also emergence of 1358 which has waterproof internal cables similar to NAMI implementation. Mantis Urban perhaps. Those models tend to correlate with an e-mark headlight.
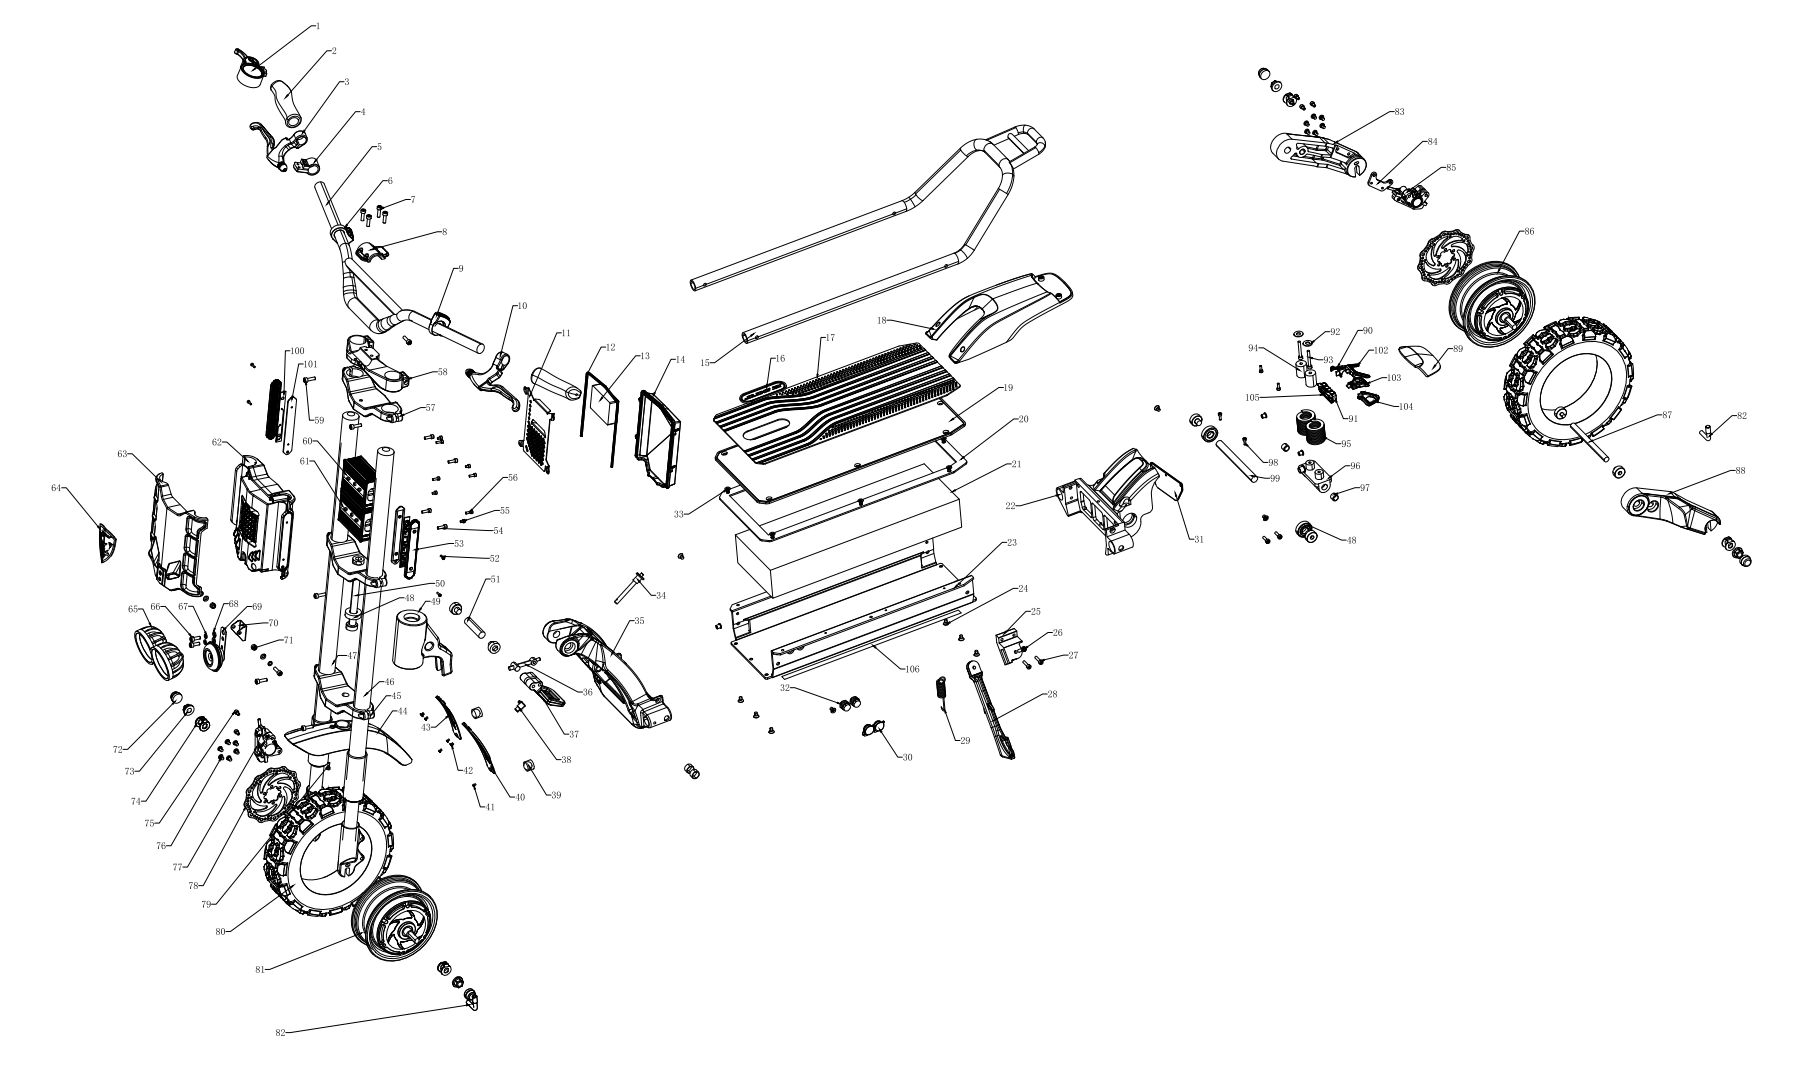
Kaabo Wolf Warrior GT Build of Materials (exploded diagram). Some parts in this catalogue will reference these BOM numbers:
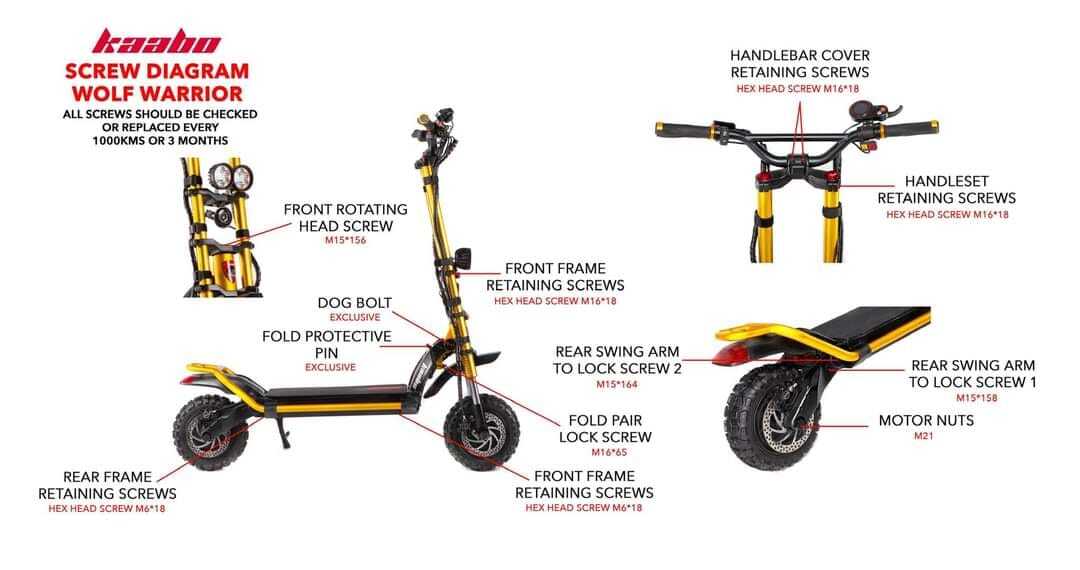
Kaabo Screw Diagram Wolf Warrior Series
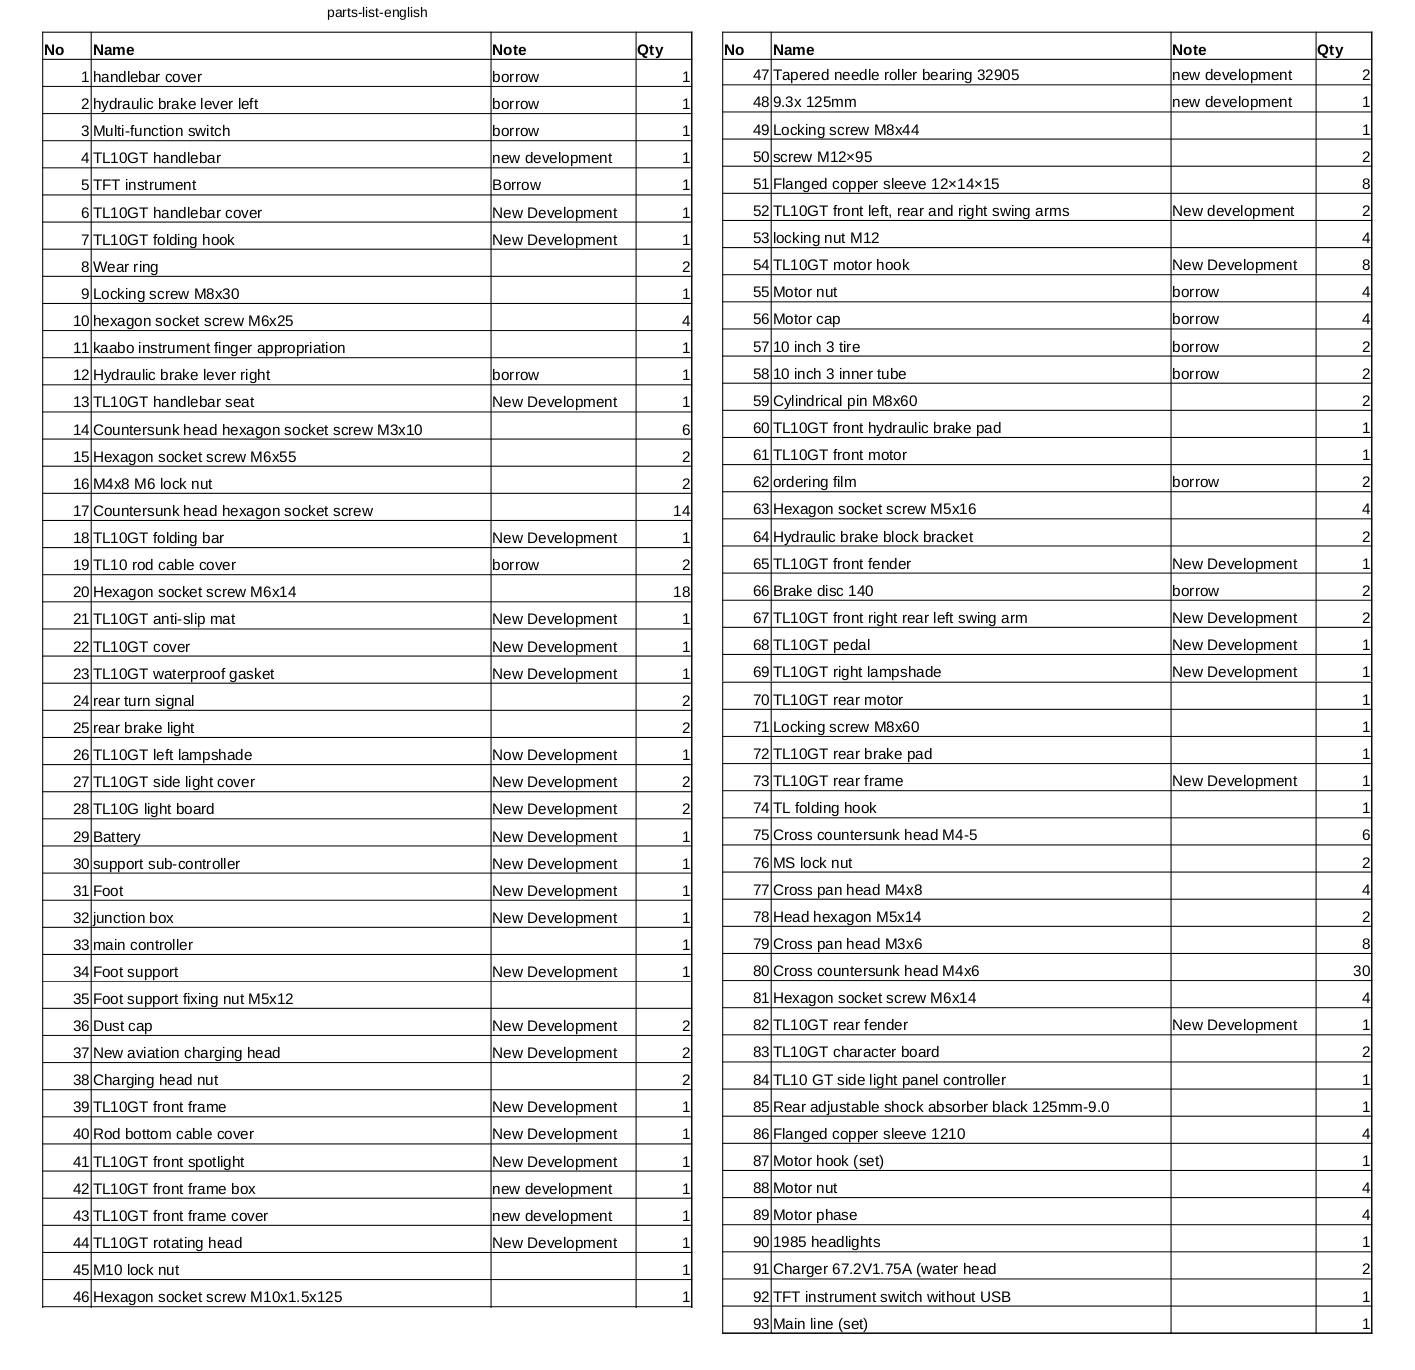
Mantis King GT BOM courtesy Giovanni Spagnoli with parts list translation by Grogorio D Pilar. Borrow means inherited from / universal with Mantis 10.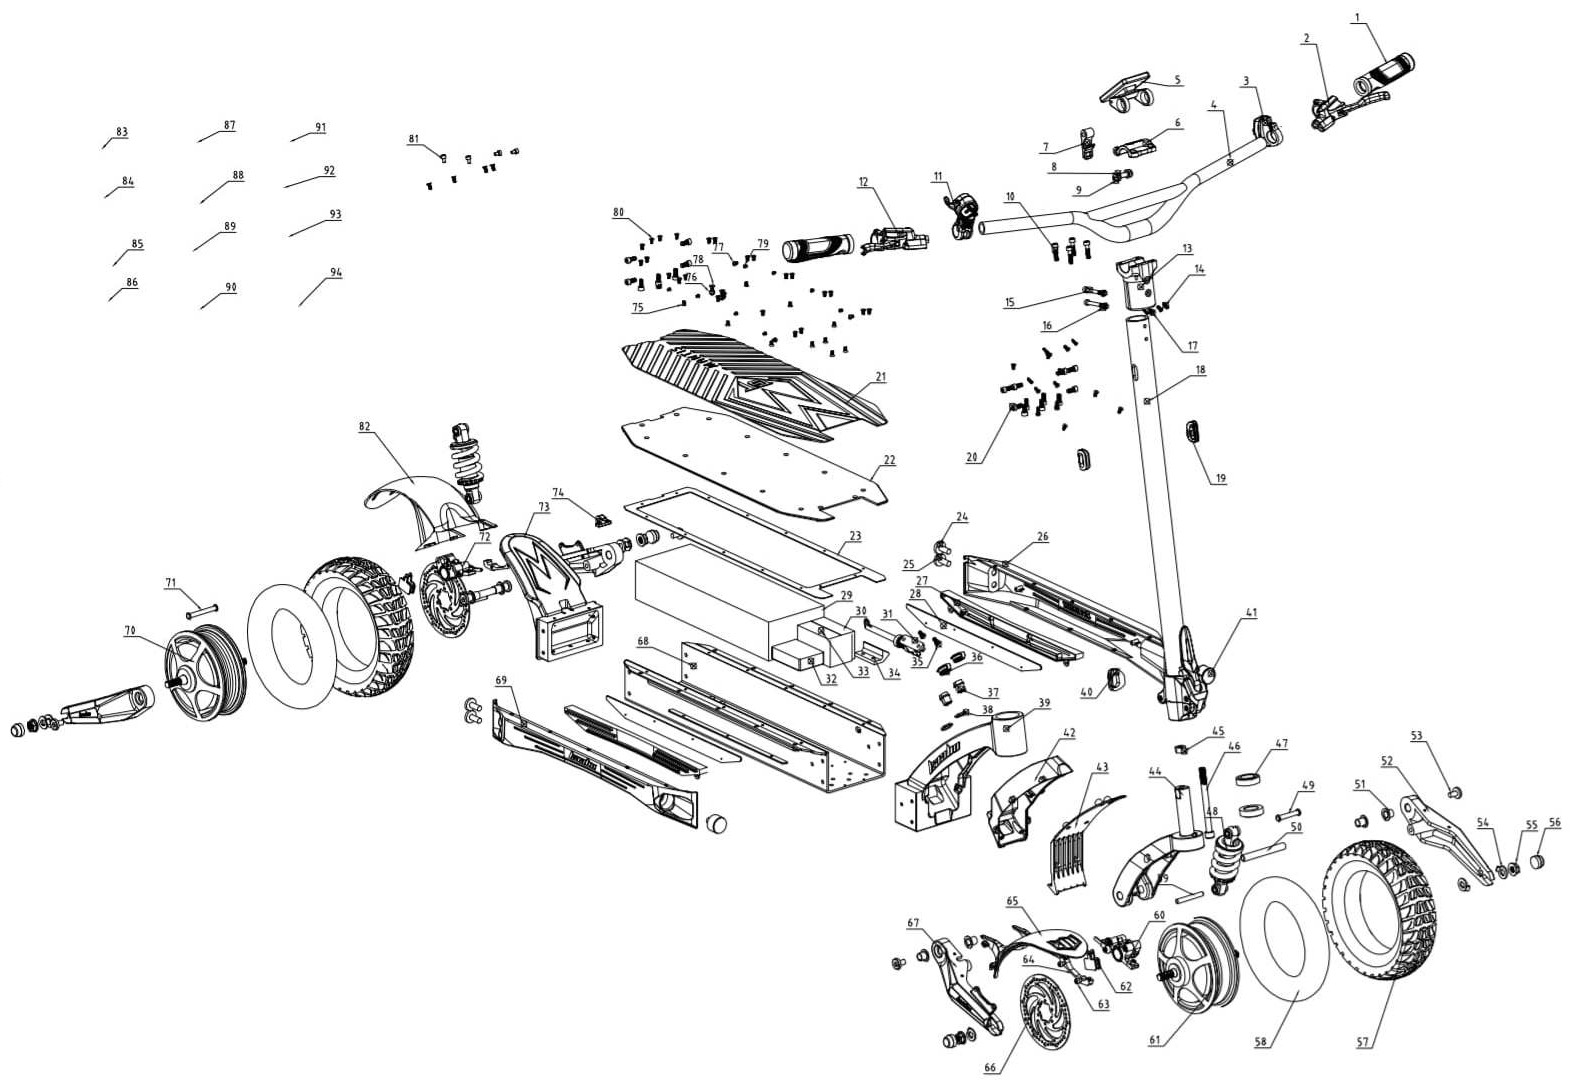
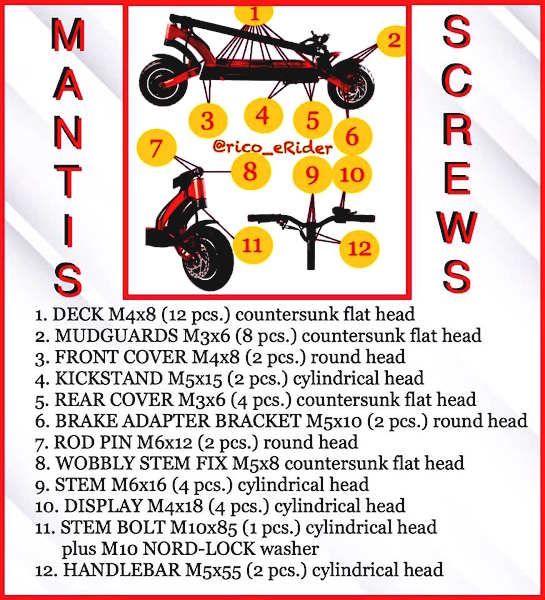
Mantis 10 series screws.
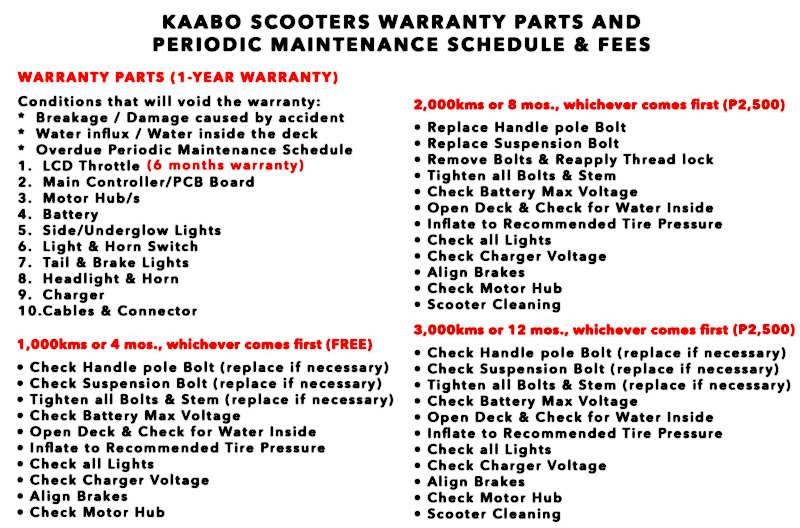
Periodic Maintenance Schedule from Kaabo Electric Scooter of the Philippines.
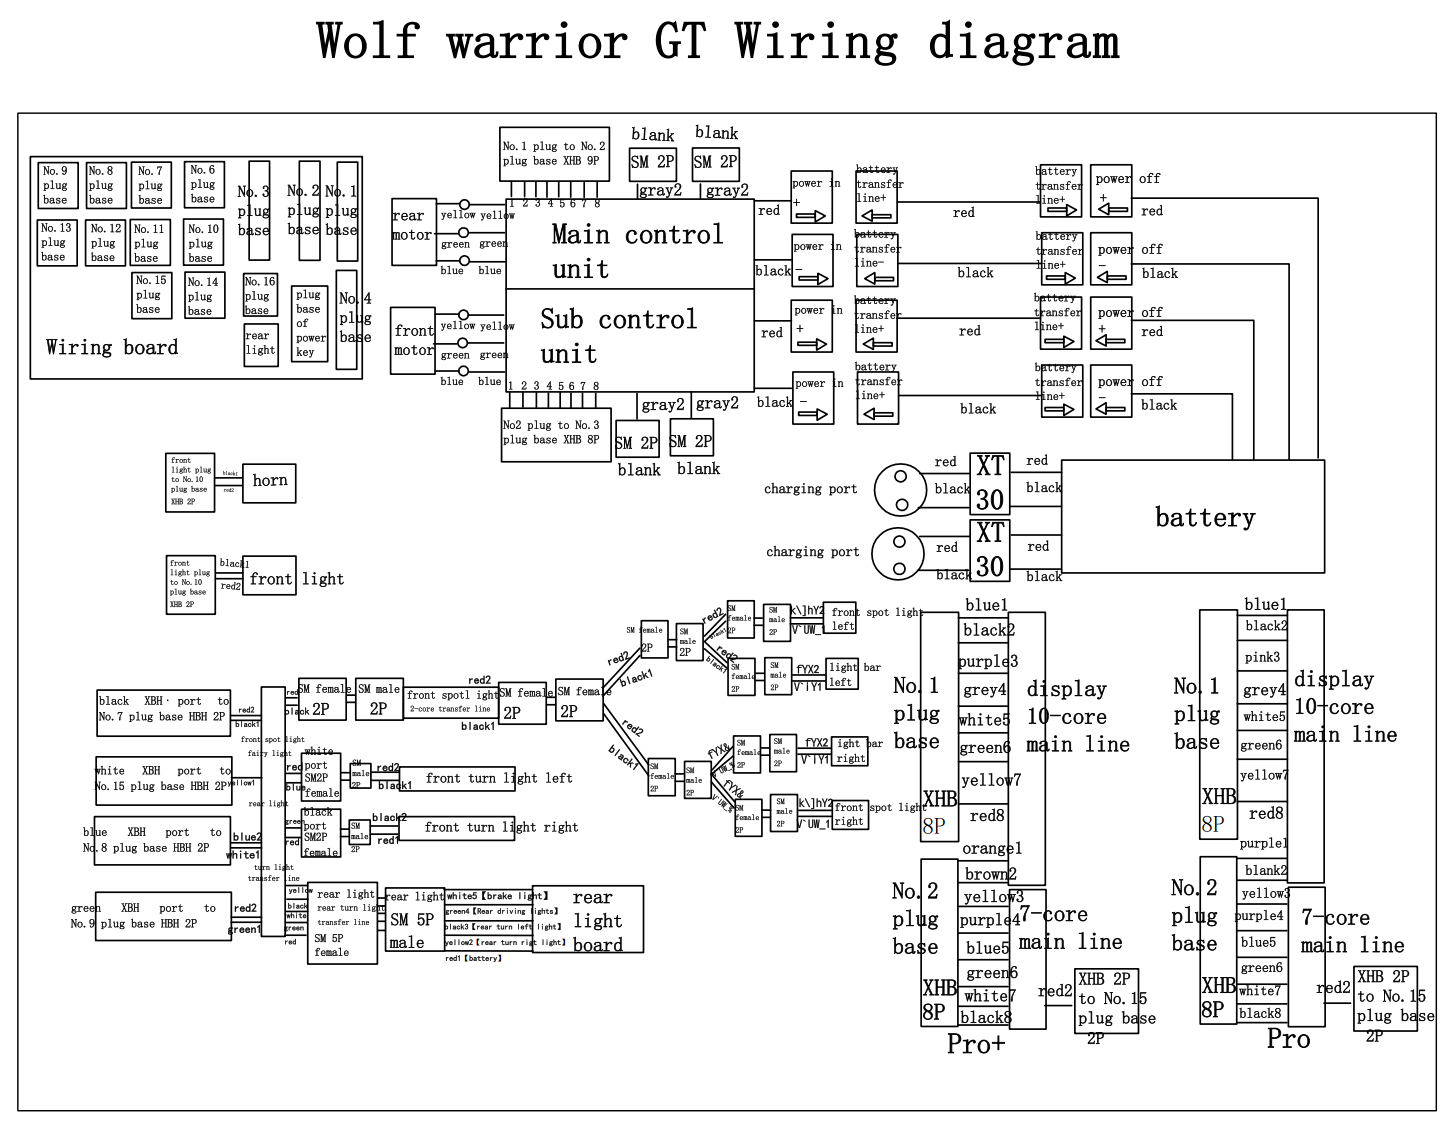
Wiring diagram for Kaabo Wolf Warrior GT series (Pro TFT / Pro+ EY3, Kaabo Black Sine Wave / MiniMotors Silver Square Wave Controllers respectively, 2x50A)
Note, No. 1 plug base shows pin 1 =-white and pin 8 = red for both GT Pro (TFT) and GT Pro+ (EY3). In almost all instances, these are observed as reversed whereby pin 5 = red and pin 8 = white. The only model observed with the drawn colours is the X Pro (EY3). Always check these ones with a meter rather than designated in diagram.
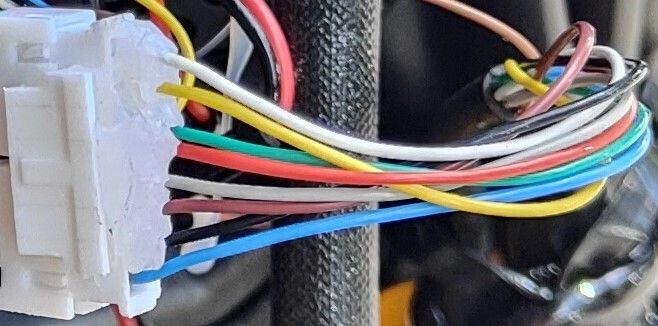
Wire colours observed on Wolf Warrior GT Pro (TFT, Sine Wave) with closer view of throttle/display, plug for plug base 1. White on the end (pin 8) in socket 1, not red as per the diagram. The brown to pin 1 on plug base 2.
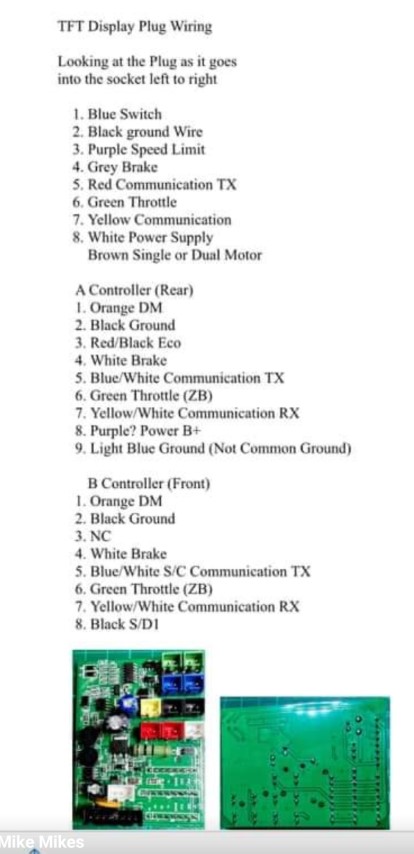
Pinouts for the number 1 plug base (display, 8-Pin), extracted from TurboTrack TurboTap type H IoT GPS Tracker Harness diagram adopts observed GT Pro (TFT) colours. Brown wire also shown.
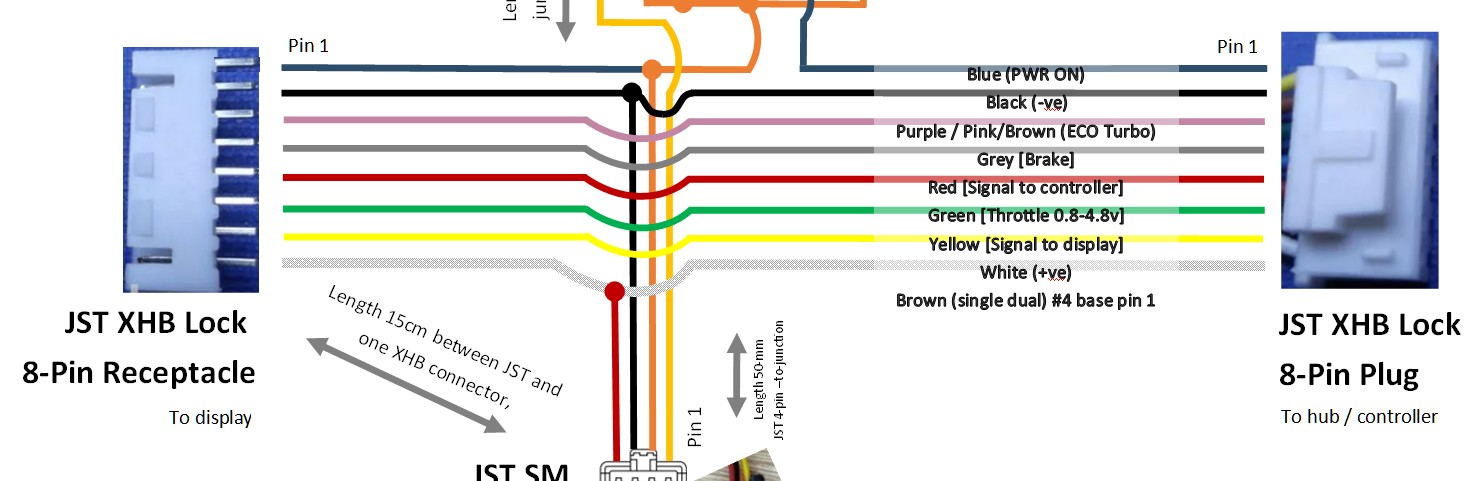
Plug base 1 (display), 2 (master control) & 3 (secondary control). DM=Dual Motor.
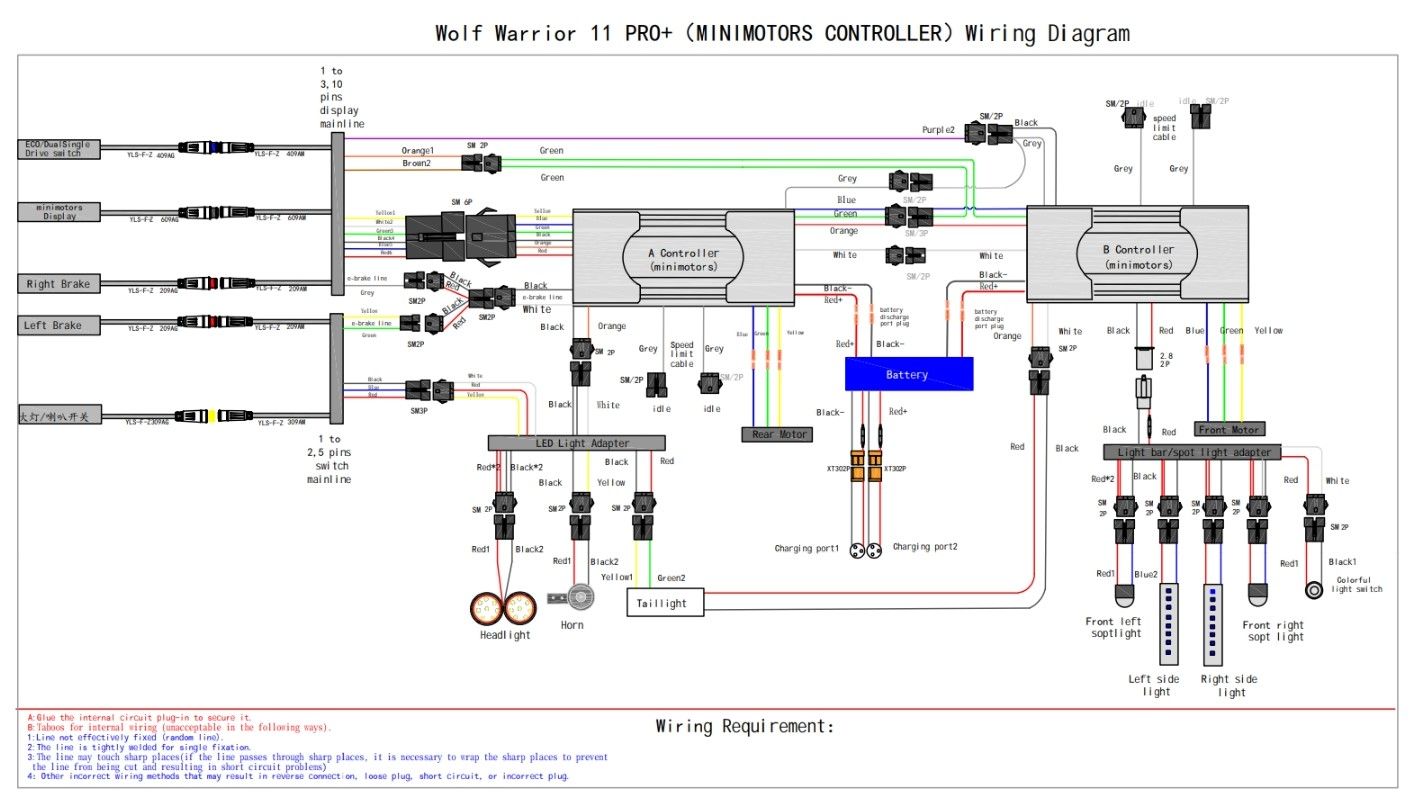
Wiring diagrams Kaabo Wolf Warrior 11 (Pro+: EY3, MiniMotors Silver Square Wave Controller 2x27 amp):
Observed wiring of Kaabo Wolf Warrior King (The 72V version of the Wolf Warrior 11, MiniMotors silver square wave controller, 2x40 amp) observed by the late Kevin Sanders.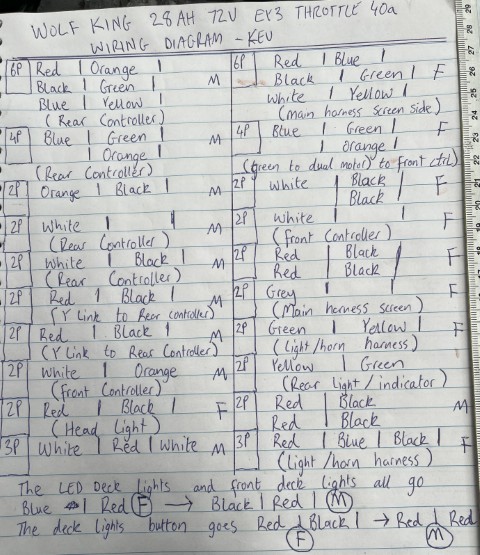
Wiring diagram Kaabo Wolf Warrior 11 (Pro: LT01, Kaabo blue Sinewave Controller 2x30 amp):
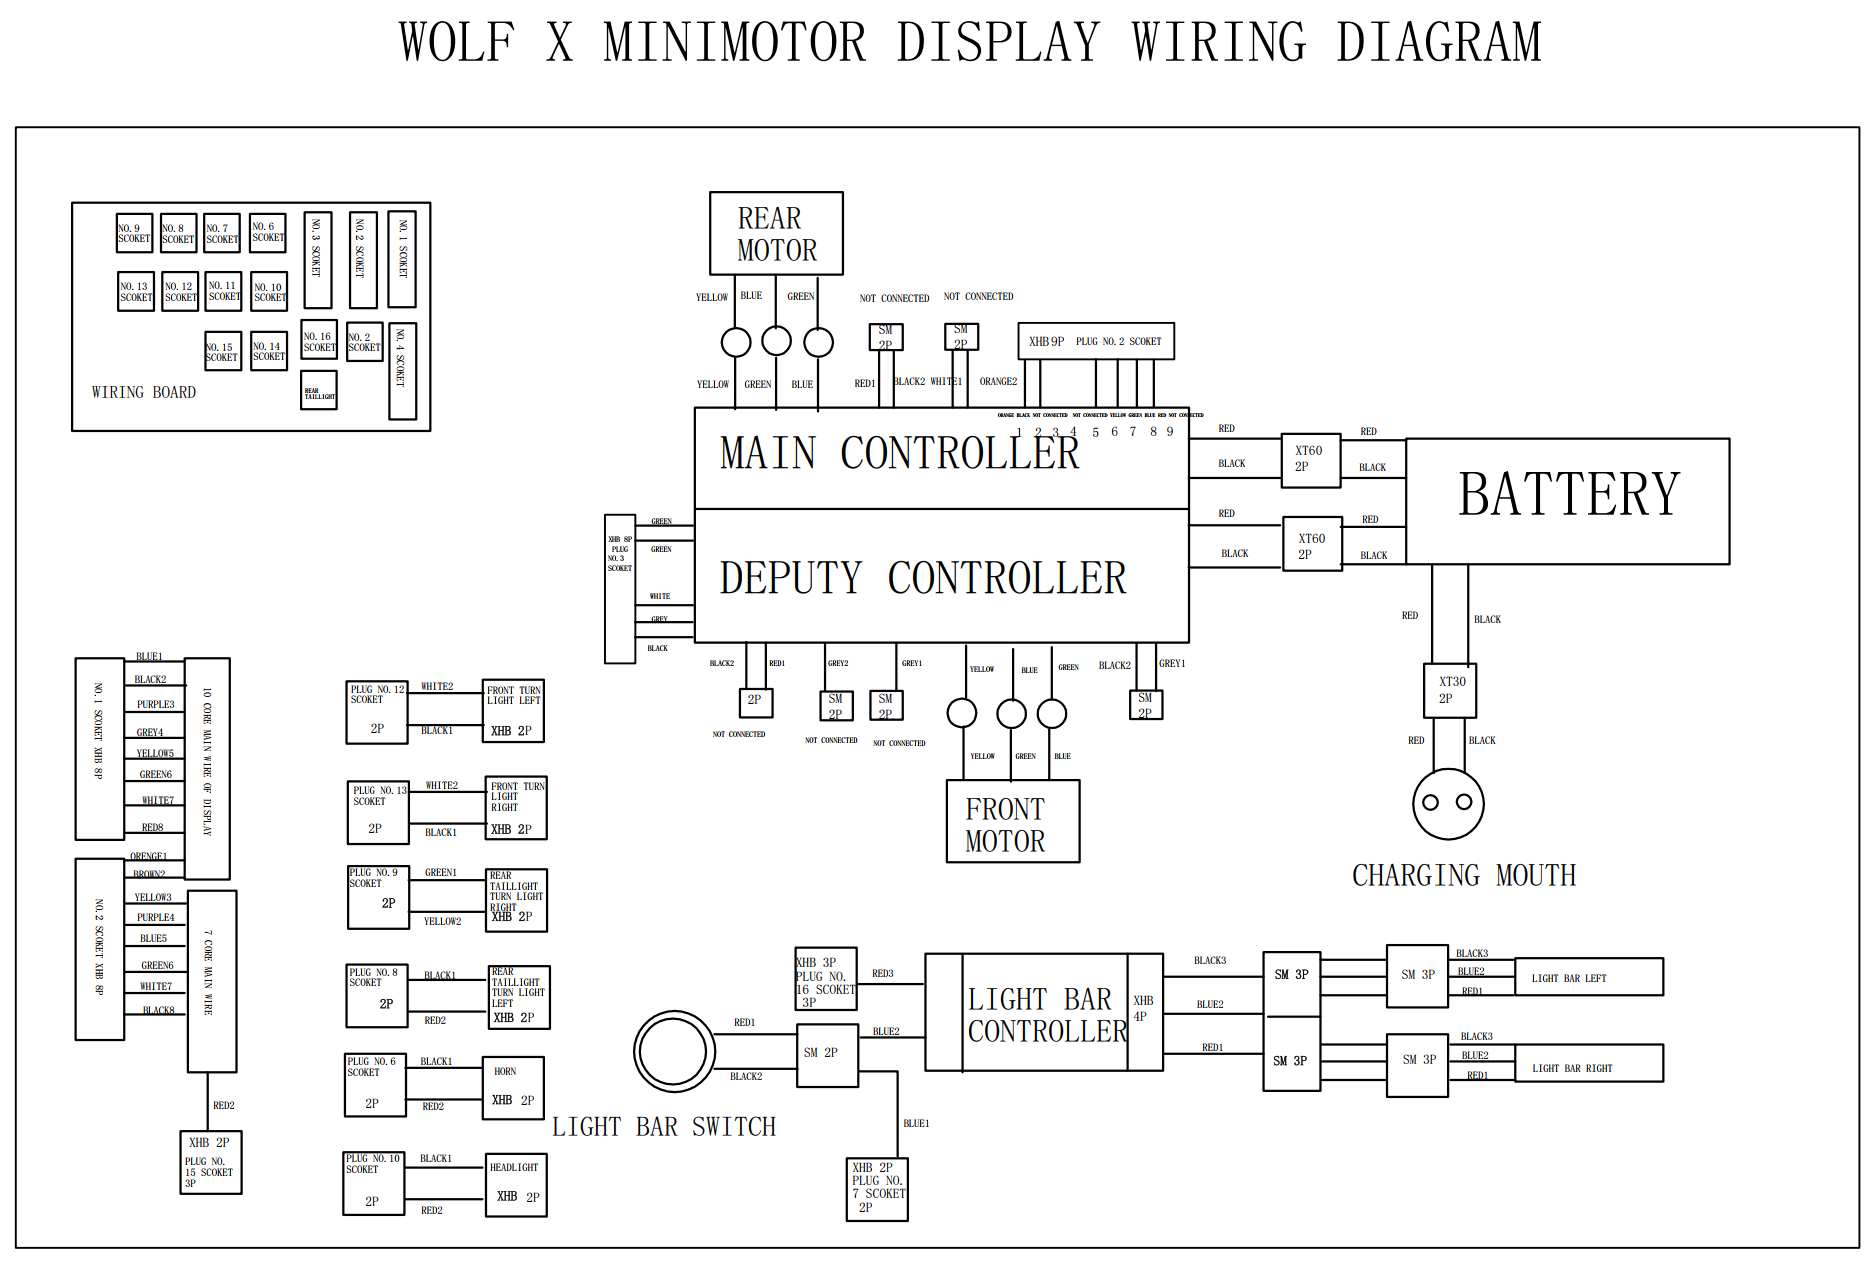
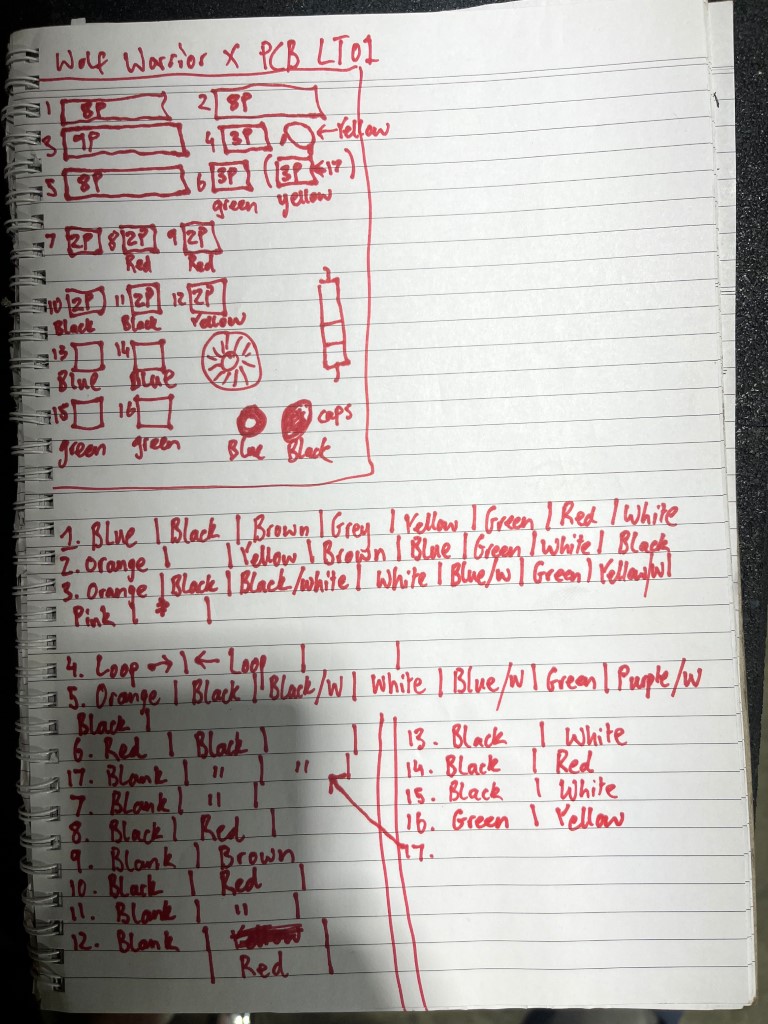
Wiring diagram Kaabo Wolf Warrior X PLUS: LT01 Kaabo Blue Sinewave Controller, 2 x 30 amp:
Wiring diagram Kaabo Wolf Warrior X PRO+: EY3, MiniMotors Silver Square Wave Controller 2 x 27 amp:
Note the variance of the wire colours on plug number 1 socket in the two above Warrior X diagrams with respect to red and white wire, and the same further below for Mantis 10. The red and white wires observed in photo's below are reversed to that in the diagrams above (and below). Similar discrepancies apply to the Wolf Warrior King GT diagram further above. Always take a meter reading to confirm pinouts/polarity and refer to more than one reference as the PRO+ (EY3) adopts different colours.
Wire colours observed on Wolf Warrior X Plus (Kaabo Sinewave LT01). Last two photo's and notepad courtesy the late Kev Sanders. Both have the orange (pin 1) on plug base 4, Kev's shows the brown on pin 2 as per diagram.

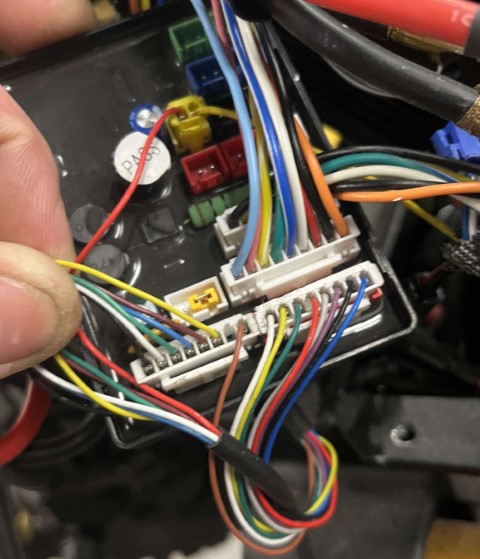
Wire colours observed on Wolf Warrior X Pro (MiniMotors EY3). The #2 master control socket (9-pin JST XH) and #3 secondary control socket (8-pin JST XH) on this early model has different colours to the X MiniMotors Display Diagram as it adopts a V1 controller with a conversion cable. The cable converts the V1 controller JST black SM connector to JST White XH connector for the wire collection board. The JST black SM connector is shown in background above the silver controller housing. Typically these early models have #1 display plug (8-pin) with pin 8 +ve as red, whereas the sine wave LT-01 Warrior X Plus model is observe with white. Likewise, pin 7 signal to display is white rather than red. Essentially red and white are swapped around as observe below across two different X Pro specimens.
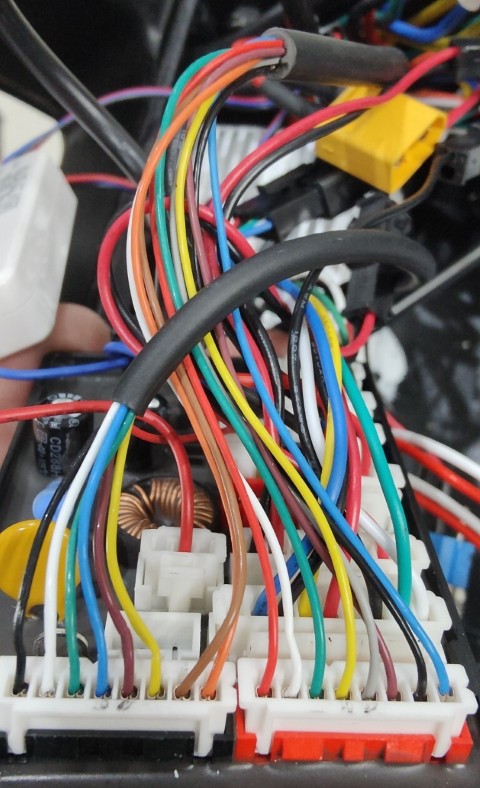
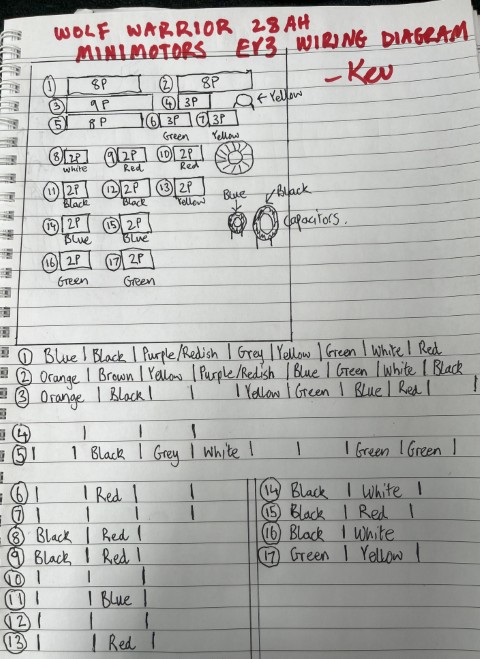
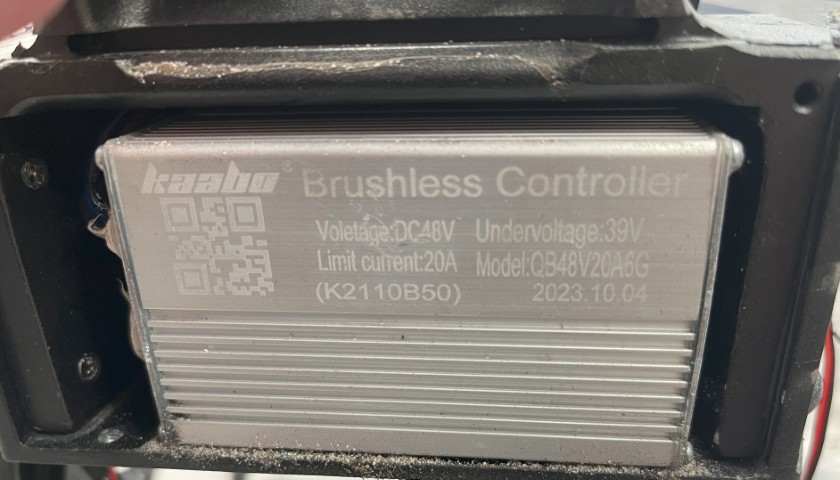
Image below from controller product page shows testing power output from controller. Note the colours here differ to the image above as this controller is the native XH equipped V2 controller. The meter reading is one of the troubleshooting methods adopted to determine if the controller is delivering power to the hub / wire collection board via the white XHB 9-pin connector. The meter shows power across the red and black wires.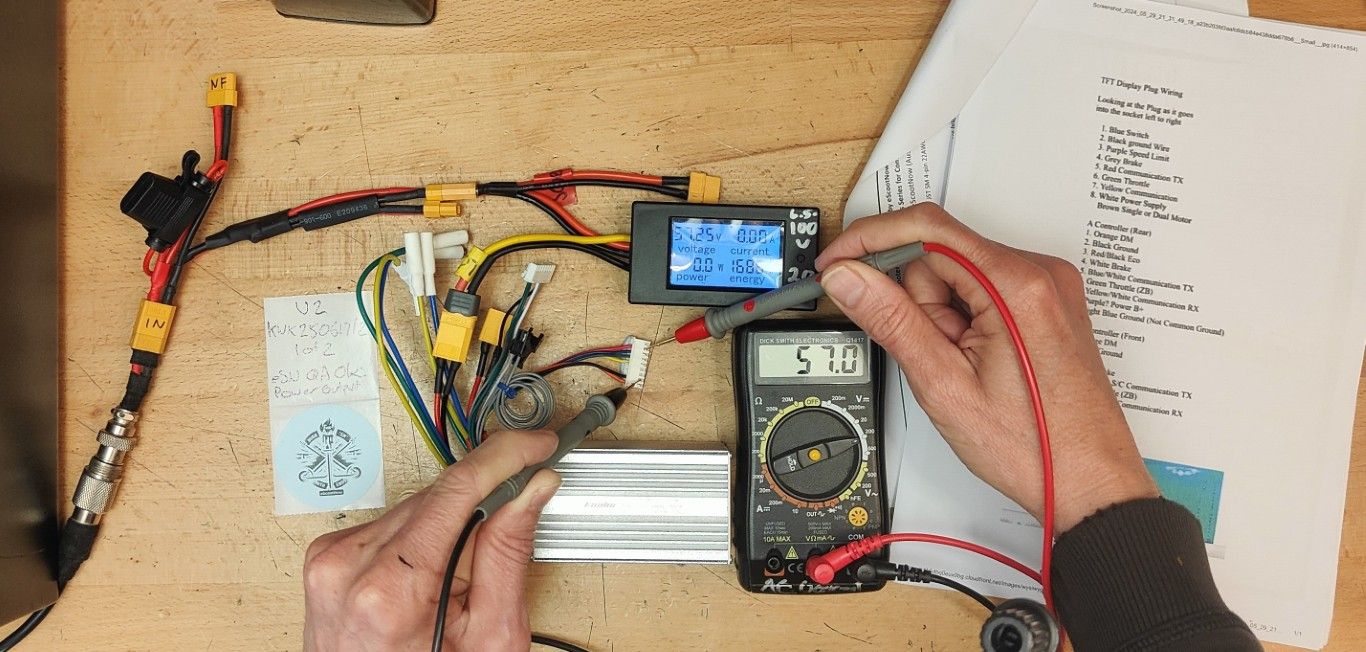
The black JST SM 6-pin pinouts for MiniMotors EY3 and LT01 non-hub models.
Observed in older, non-hub models of Mantis and Warrior 11. Note, some earlier Dualtron models adopts a 7-pin JST SM connector for throttle/display, the additional white wire is for headlights. Kaabo does not adopt this 7th pin.
| Main line receptacle to EY3 |
MiniMotors Controller plug |
Pin / purpose | Kaabo Controller plug |
Main line receptacle to LT01 |
| White (Dualtron) | Headlight | |||
| Yellow | Yellow | 1 RxD | Yellow/White | Red |
| White | Blue | 2 TxD | Blue/White | Yellow |
| Green | Green | 3 Throttle | Green | Green |
| Black | Black | 4 -ve | Black | Black |
| Blue | Orange | 5 PWR ON | Orange | Blue |
| Red | Red | 6 +ve | Pink | White |
The diagram below shows the MiniMotors EY3 JST SM 7-pin connector (source: Reddit).
If you are unsure as to where "pin 1 resides on JST SM, reference the below image.
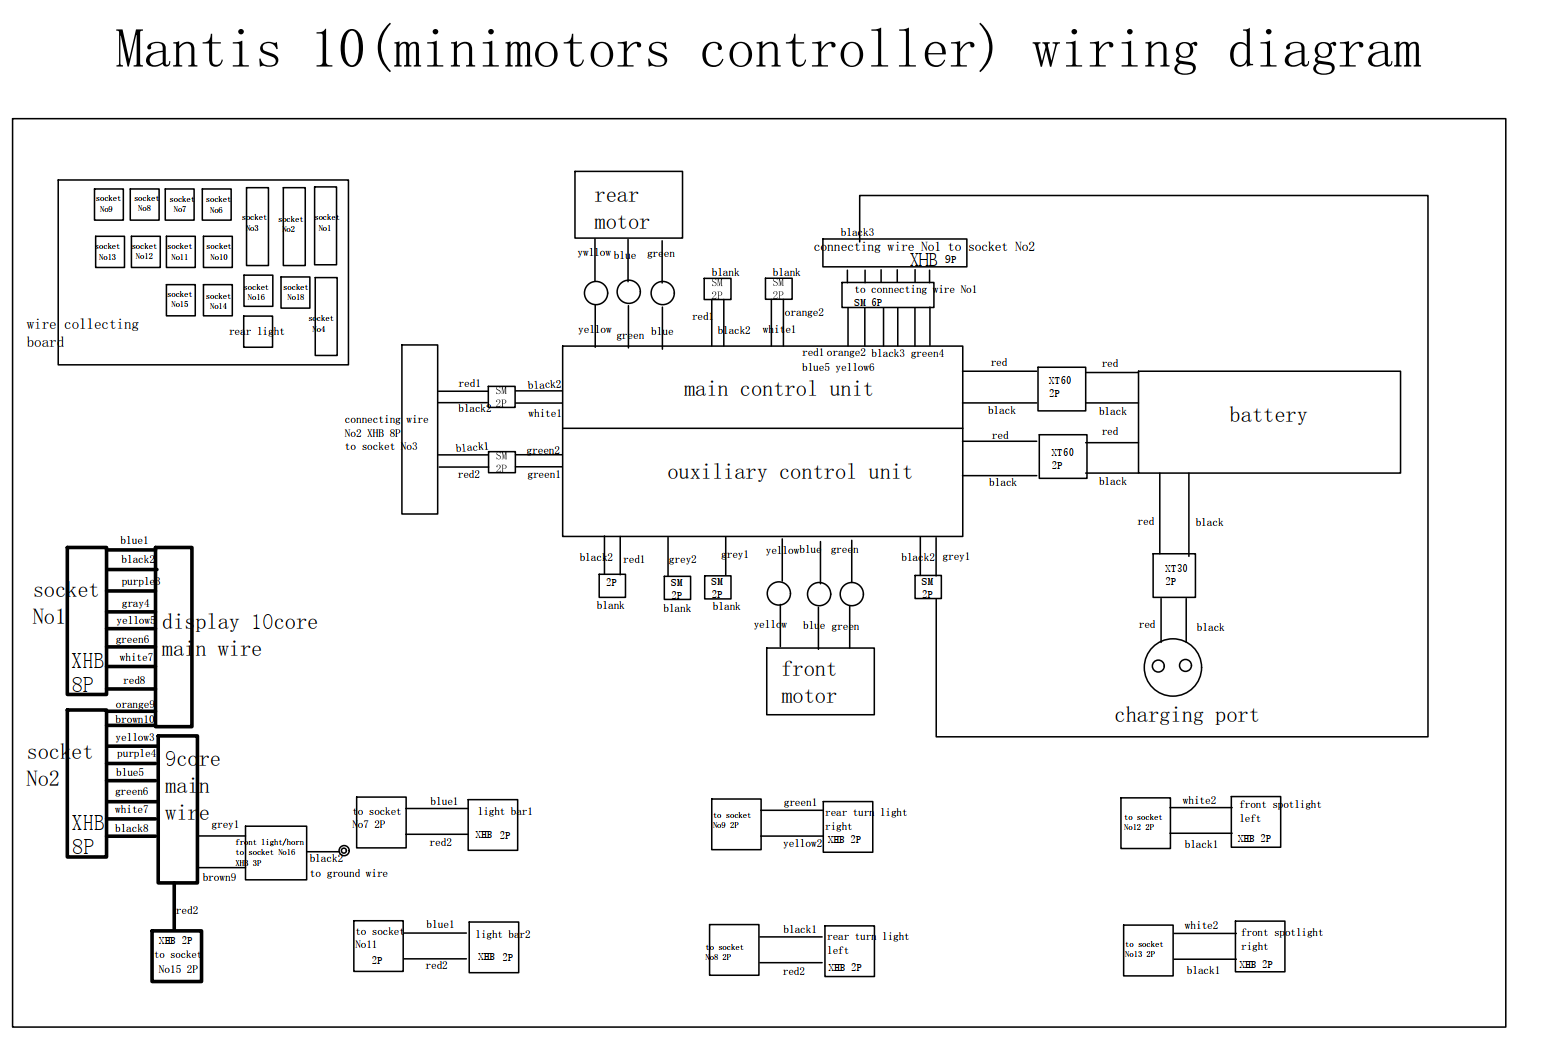
Wiring diagram for Kaabo Mantis 10 (Pro pre-2025: EY3, Wire collection board models introduced 2022 inaugural 8 and "V2" 10 which introduced headlight, MiniMotors Silver Sine Wave controller, 2x27 amp). This diagram shows the conversion cable that adapts the JST black SM 6-pin connector on the controller to XH9-pin for socket number 1.
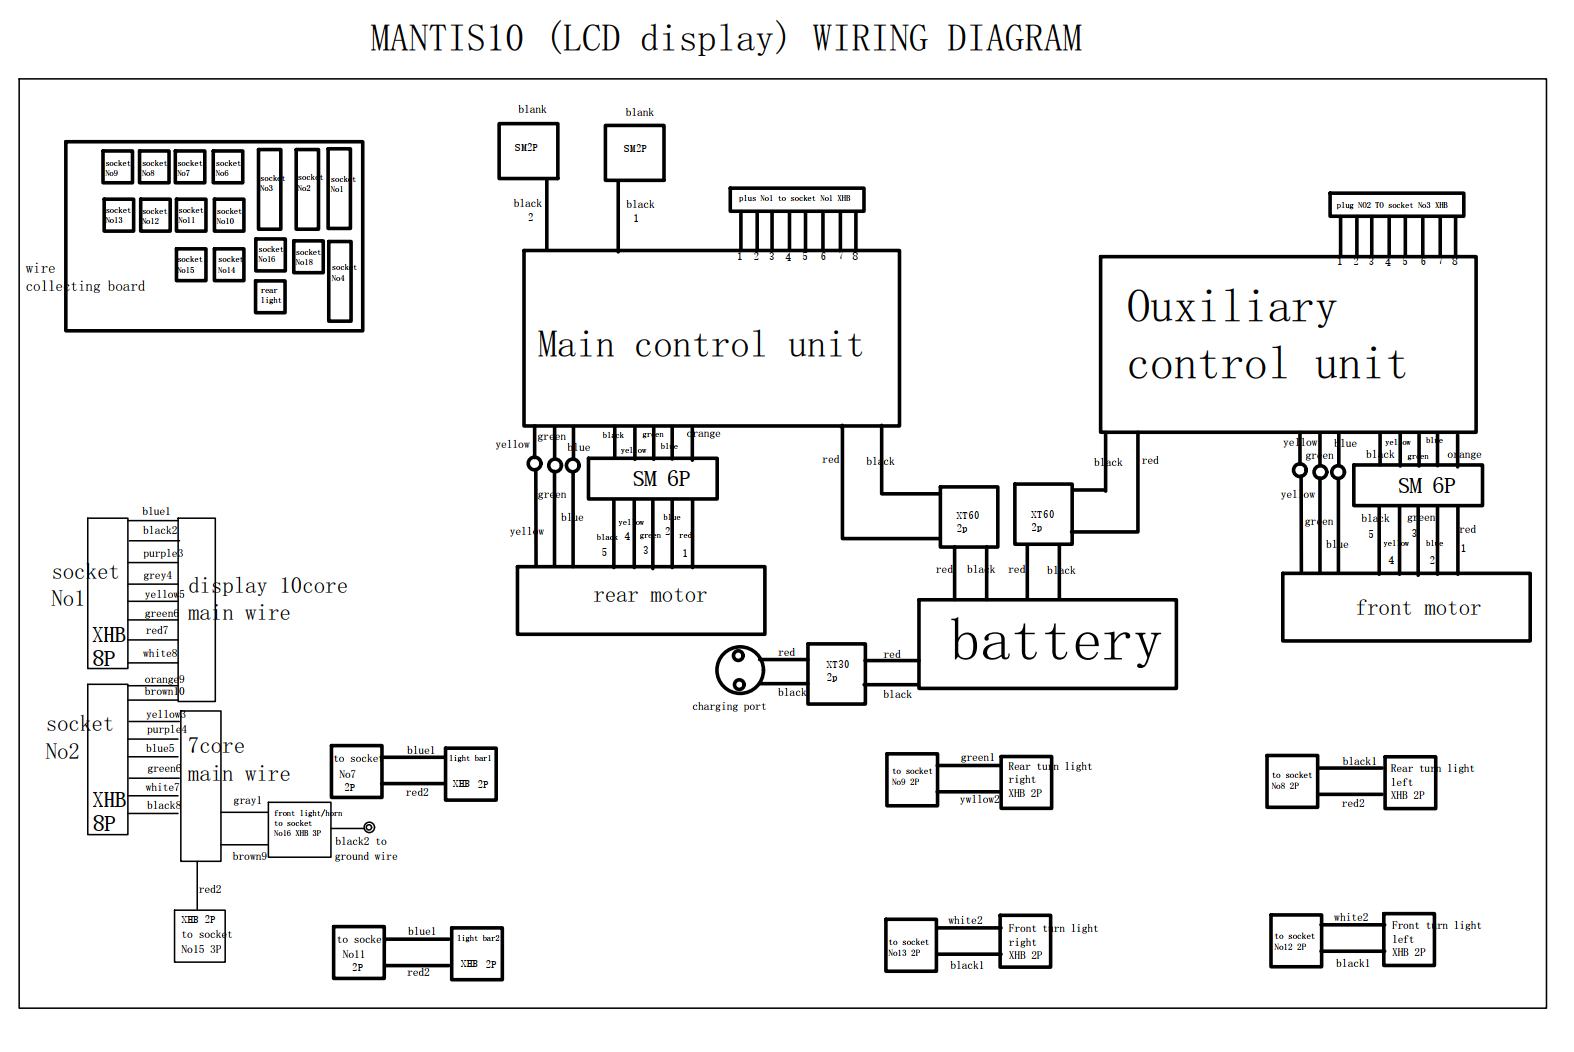
Wiring diagram for Kaabo Mantis 10 (non-Pro pre-2025: LT01, Wire collection board models introduced 2022 inaugural 8 and "V2" 10 which introduced headlight, Sine Wave 2x25 amp).
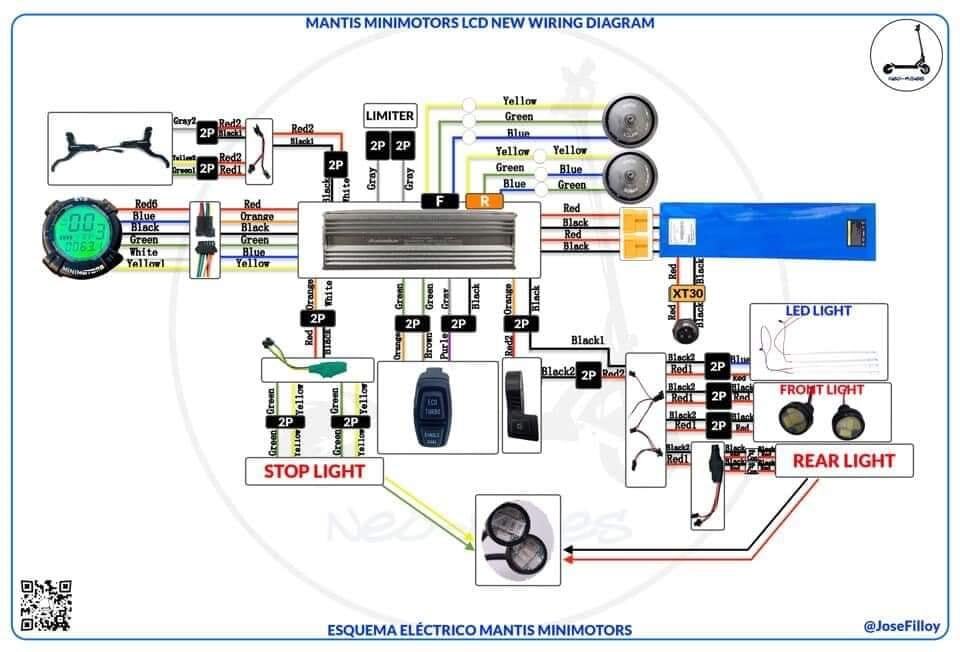
Kaabo Mantis 10 (non-hub, older pre-2022 no-headlight version) MiniMotors Controller EY3 - Squarewave wiring diagram (JoseFilloy pictorial):
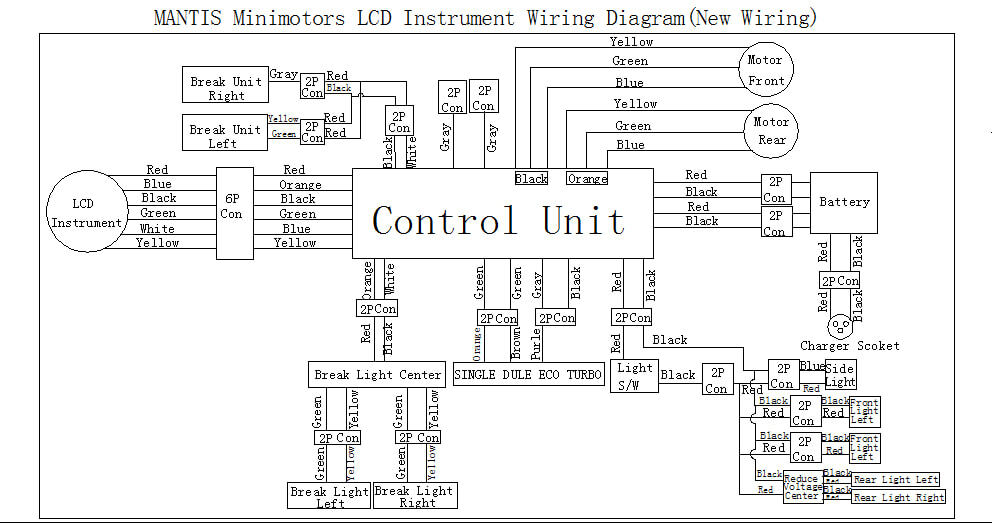
Kaabo Mantis 10 (non-hub, older pre-2022 no-headlight version) MiniMotors Controller EY3 - Squarewave wiring diagram (new wiring):
Kaabo Mantis 10 (non-hub, older pre-2022 no-headlight version) Standard in-house Controller LT01 - Kaabo SInewave wiring diagram (new wiring):
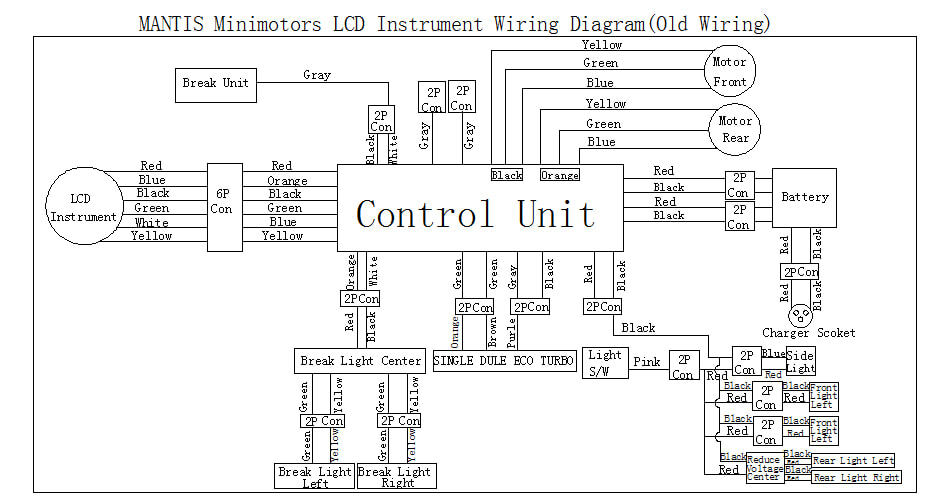
Kaabo Mantis 10 (non-hub, older pre-2022 no-headlight version) MiniMotors Controller EY3 - Squarewave wiring diagram (old wiring):
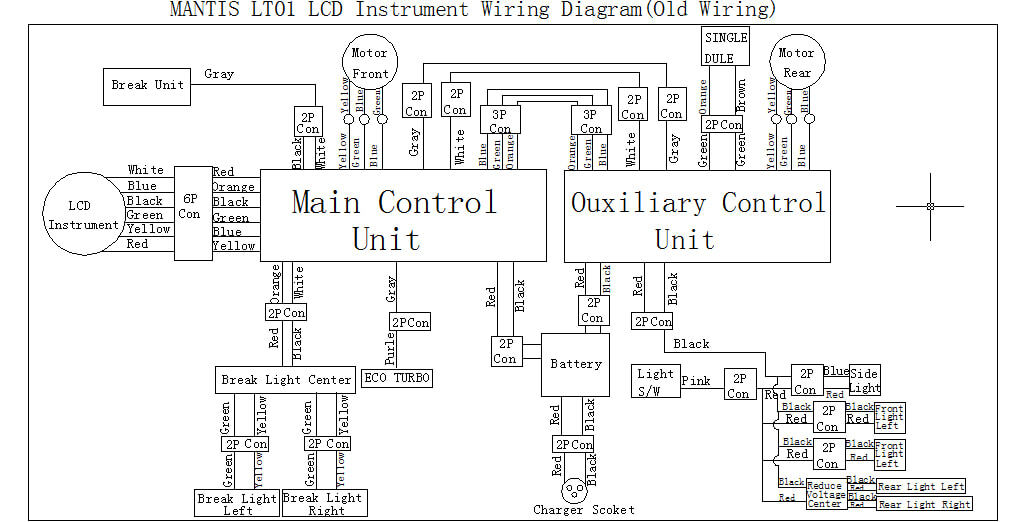
Kaabo Mantis 10 (non-hub, older pre-2022 no-headlight version) Standard in-house Controller LT01 - Kaabo SInewave wiring diagram (old wiring):
Above Mantis diagrams are for Mantis 10. Mantis 8 may have variation (for example, Mantis 8 Pro MiniMotors is similar to Mantis hub / wire collecting board series). There may be some errors or variations to the factory diagrams, it is always prudent to validate wiring with a multimeter and/or following lines.
Wire collection board / hub (HUB-1)
Kaabo transitioned the wiring system with a Wire Collection Board / Hub (HUB-1) as shown on the eScootNow product page between late 2021 - early 2022. Models include the Mantis 8 Pro (which was one of the first adopters of this system), The Mantis 10 SE followed, then the newer headlight equipped versions of the Mantis 10 Pro (the "v2") and then inaugural production of the Warrior X then Warrior GT. This "HUB" uses white JST XHB locking style connectors rather the black JST SM connectors.
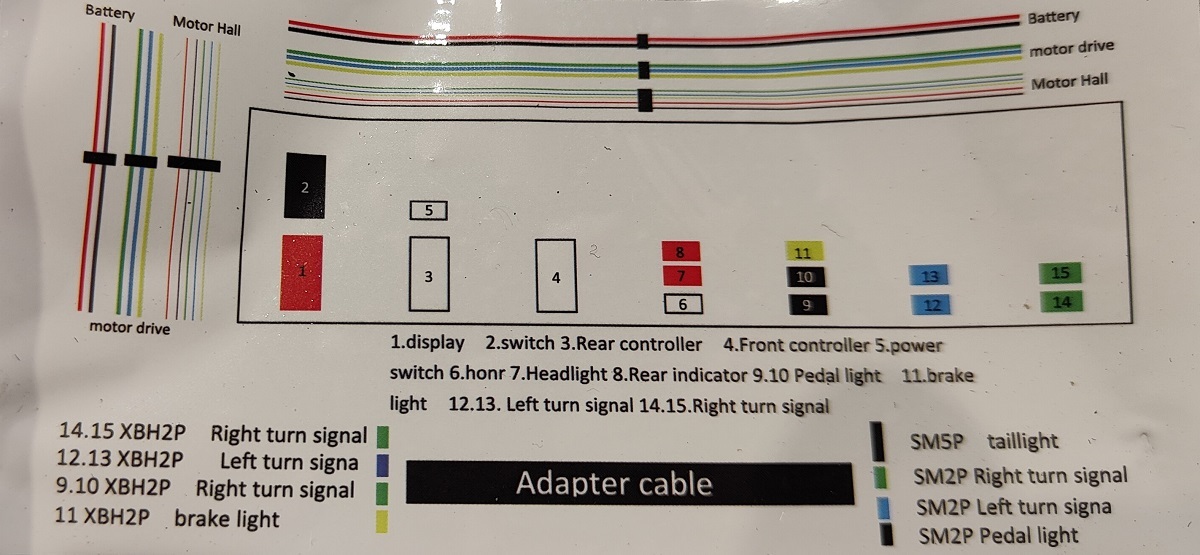
Connector designation from nameplate on inside of the black enclosure (lid). Usually these are on the outer side. Typically a jumper is fitted in connector #5 in lieu of physical key-lock (power switch).
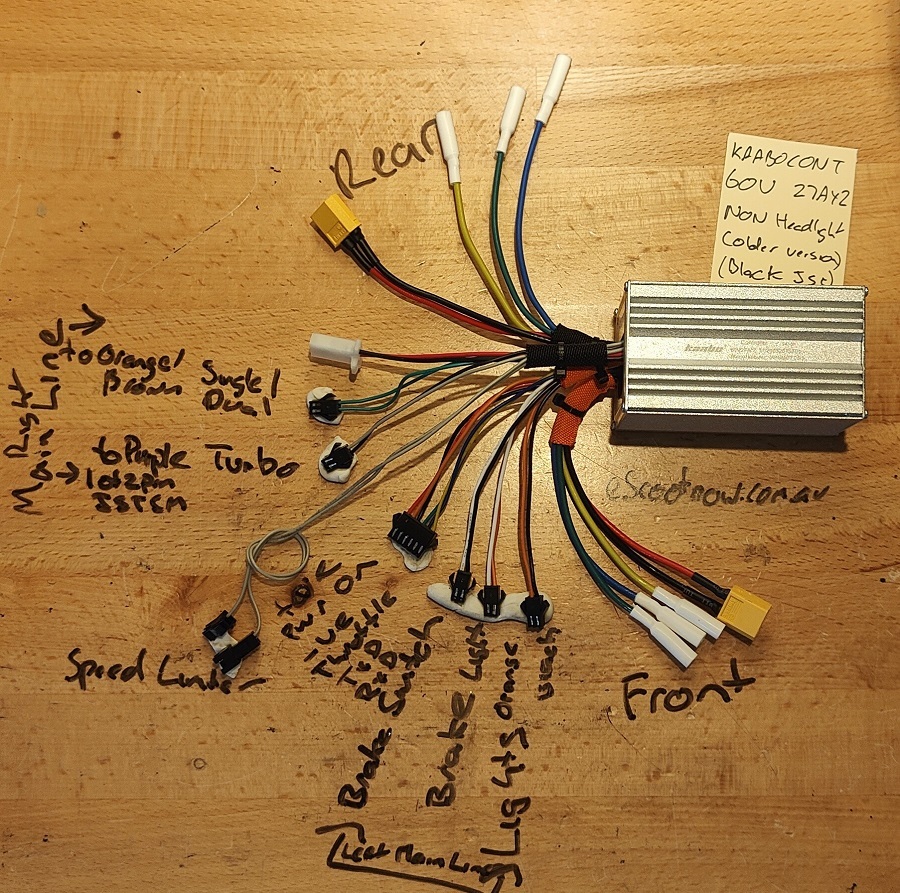
Early Model Wolf Warrior GT's were observed with also having a white sticker inside the Electric Controller Box. It uses a different numbering sequence and is erroneous. Astute observers will notice the connector on white label #8 is erroneously marked as Rear indicator, it should be 60V Head light (high voltage, inc 72V, in the position per #14 on the black housing nameplate). The white label does not designate low and high voltage for headlight, for further info see the headlight product page.
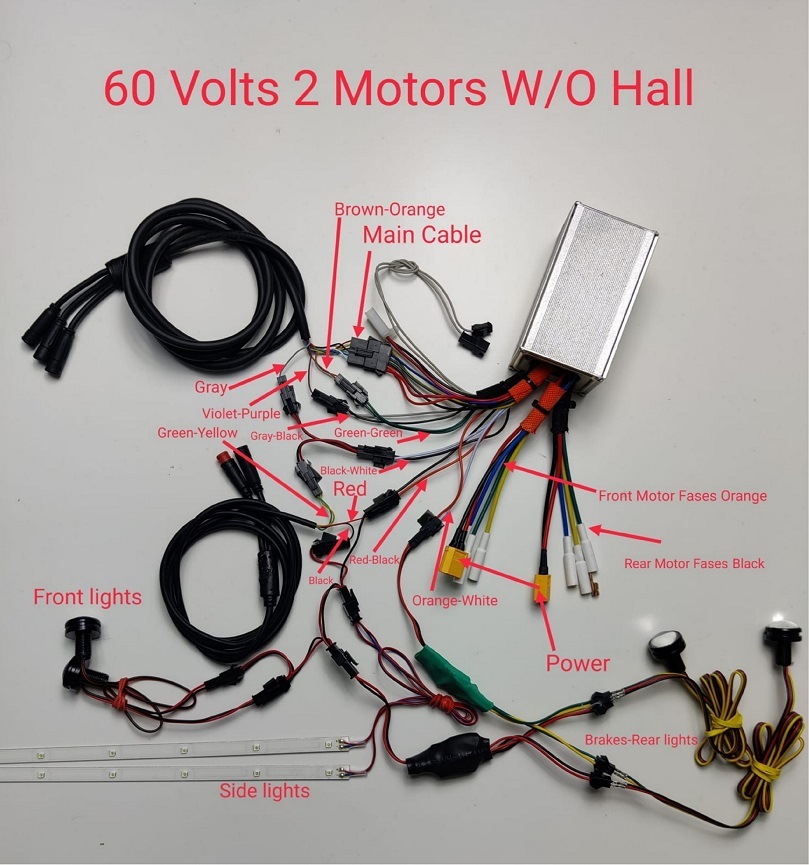
Diagram of Minimotors controller for newer (headlight) version from eScootNow product page.
and here is the main line wiring harness with that controller (the JST SM 2-pin to lights shown as red-black should be orange black).
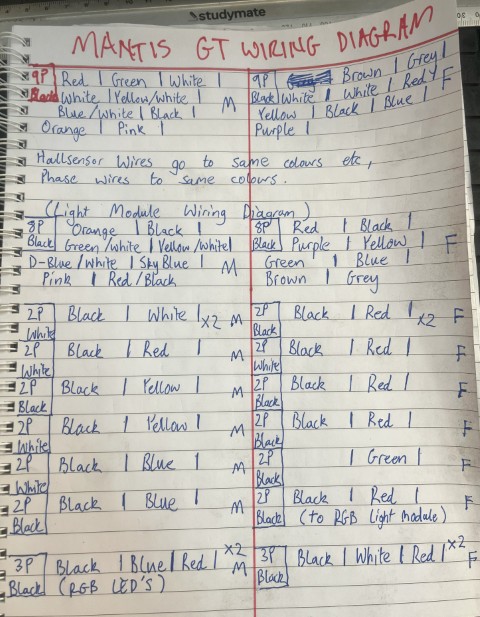
Mantis King GT wiring courtesy the late Kev Sanders. Mantis King GT adopts universal main line left and right, only difference being JST housing between each side.
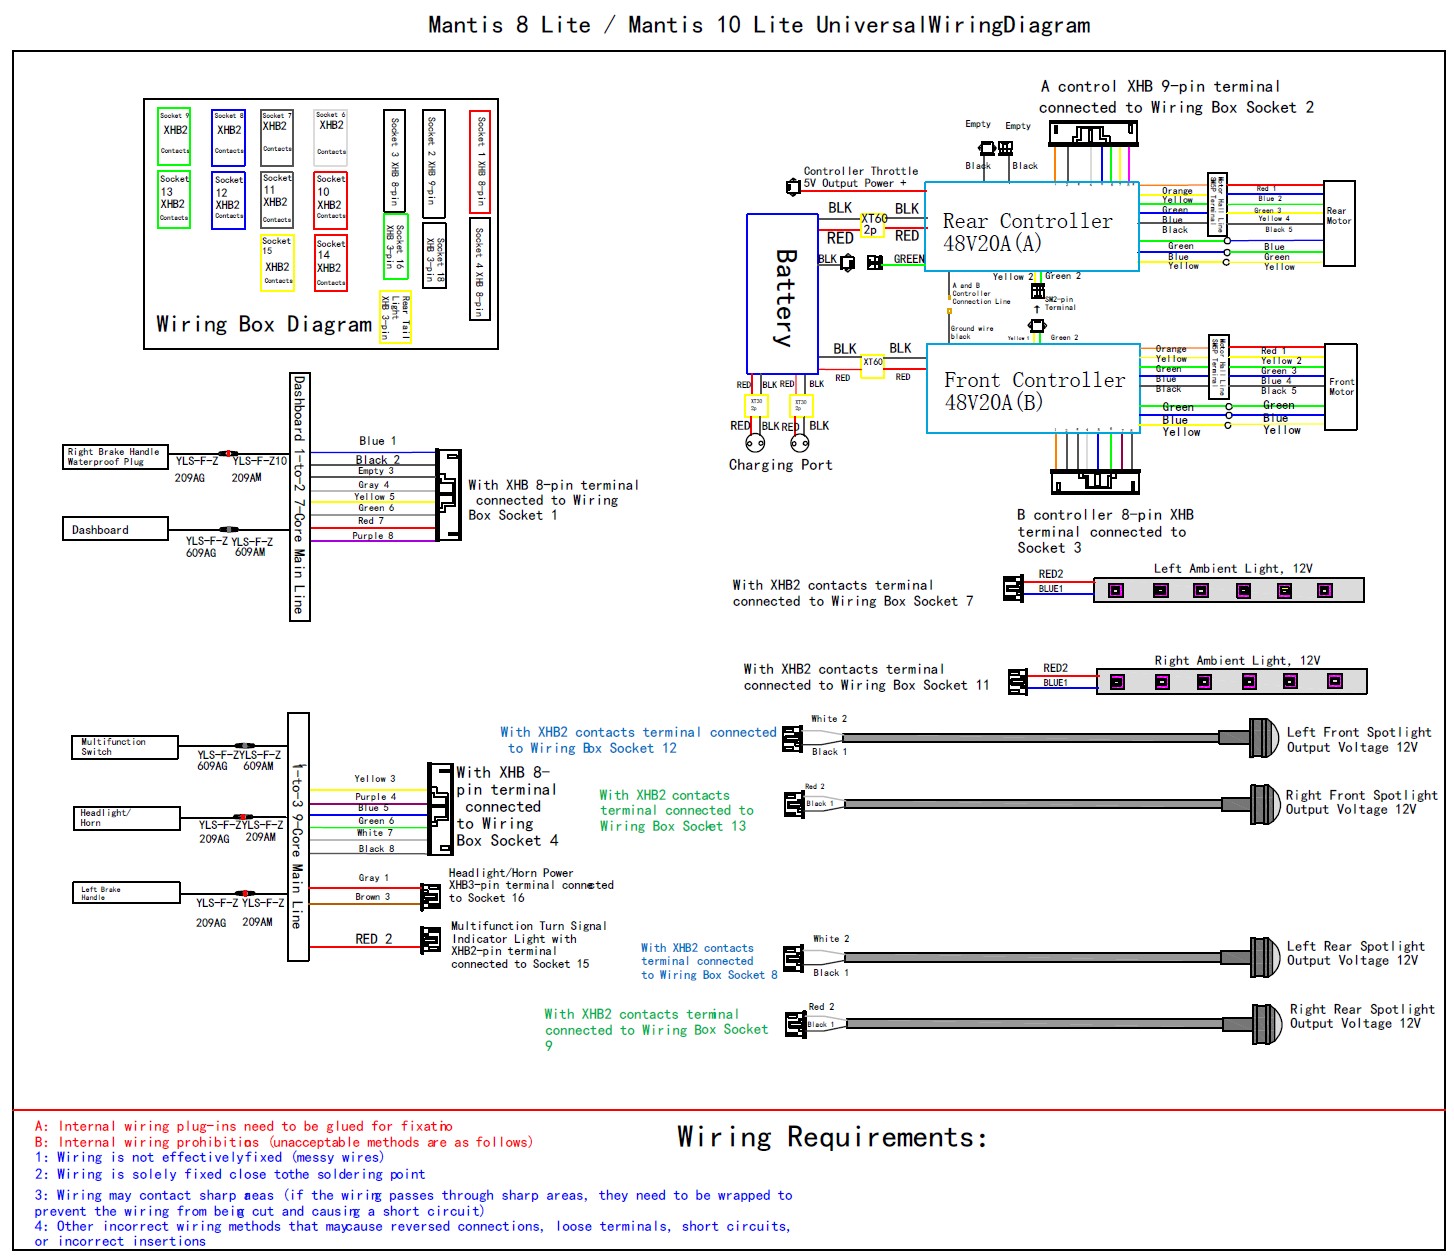
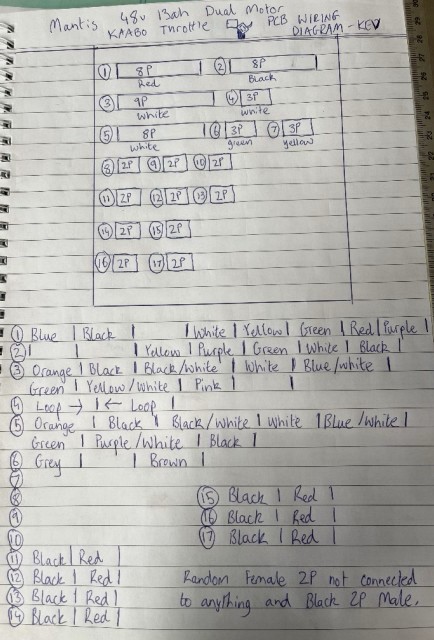
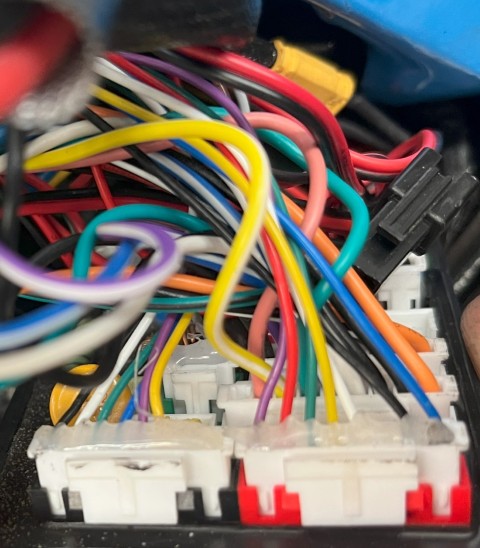
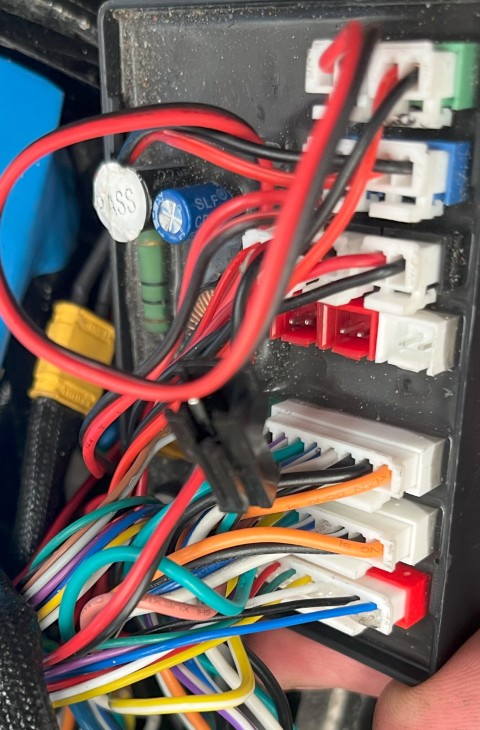
Wiring diagram Kaabo Mantis 8 / 10 (Lite: K2 models introduced 2025 - Kaabo Display CM06, Kaabo Silver Sinewave Controllers 2x20 amp 48V 13Ah). Introduces socket 16 (headlight/horn power), Rear Tail Light (assumed 17) and 18 (keylock). Kev's work further below in accordance:
Wiring diagram Kaabo Skywalker / Sky (8S / 8H: LT01). 10C further below is similar: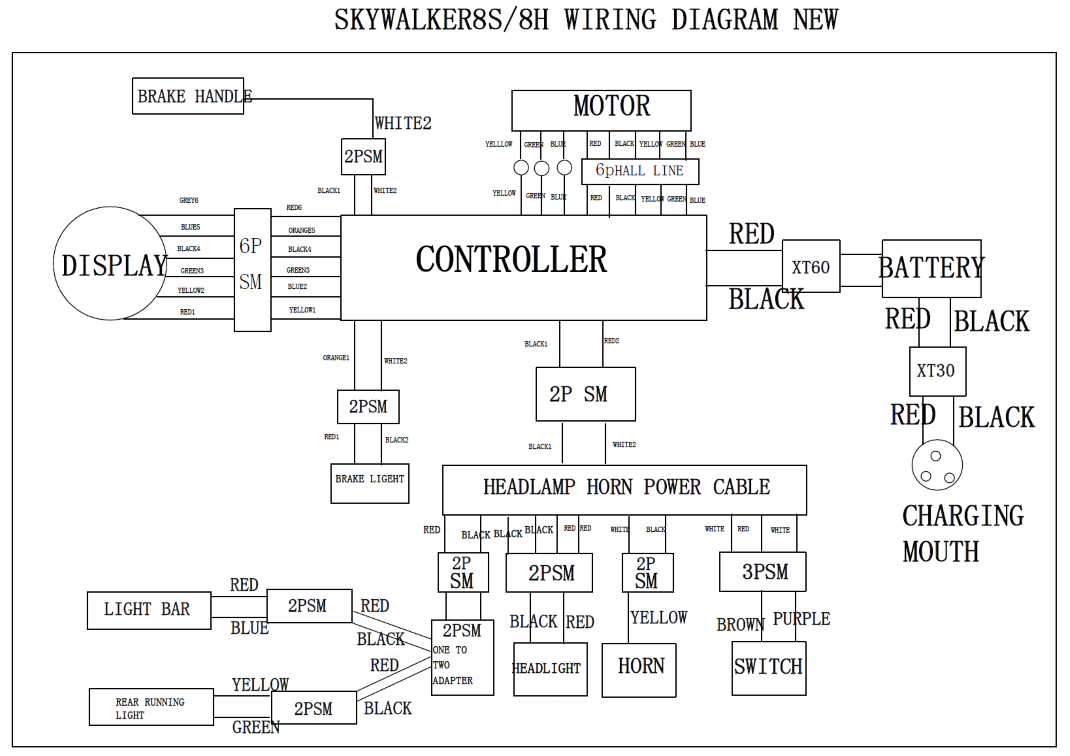
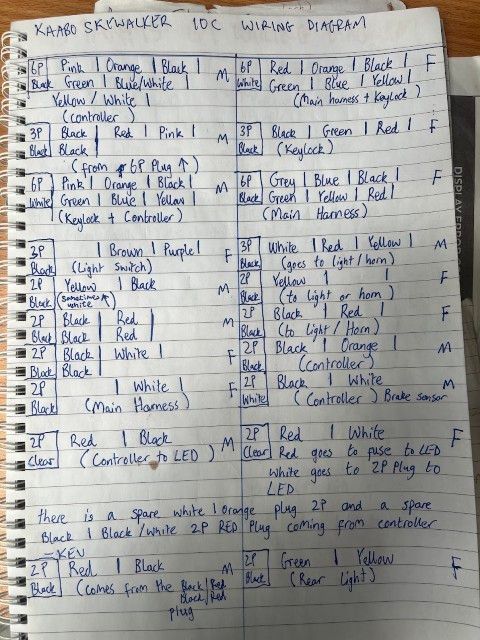
Wiring diagram Kaabo Skywalker / Sky (10C: LT01) from Kev:
Refine by
")
Kaabo Wolf Warrior 11 / GT Series Handlebar (750mm lengthened / extended)
Kaabo Wolf Warrior 11 / GT Series Handlebar (750mm lengthened / extended)
Longer, upgraded bar for improved handling and stability.
AU$54.55

Kaabo Wolf Warrior 11 / GT Series Handlebar Riser
Kaabo Wolf Warrior 11 / GT Series Handlebar Riser
Raises handlebar height by 55mm.
AU$126.36

Electric Brake Hall Sensor Switch for Zoom & TurboBrake Hydraulic Lever
Electric Brake Hall Sensor Switch for Zoom & TurboBrake Hydraulic Lever
Suits hydraulic levers of Zoom such those on Kaabo Wolf, Mantis Pro & VSETT and TurboBrake on Teverun - both adopted on most Dragon models.
AU$15.00
")
Zoom Hydraulic Brake Lever (suit Kaabo, Teverun, VSETT)
Zoom Hydraulic Brake Lever (suit Kaabo, Teverun, VSETT)
For replacement of damaged levers
AU$53.64

Zoom "HB-875E" 2-Piston Hydraulic Brake Calliper
Zoom "HB-875E" 2-Piston Hydraulic Brake Calliper
Suits Kaabo Mantis / Wolf Warrior, VSETT, Dragon Lightning & Teverun
AU$54.55

Kaabo LT01 Standard Finger Throttle/Display suit Mantis and Wolf Warrior
Kaabo LT01 Standard Finger Throttle/Display suit Mantis and Wolf Warrior
Suit Mantis 8/10 (non-Pro/SE/Elite), Wolf Warrior 11 Plus and X Plus.
AU$77.27

Kaabo LT01 Thumb Throttle/Display suit Mantis and Wolf Warrior
Kaabo LT01 Thumb Throttle/Display suit Mantis and Wolf Warrior
Suit Mantis 8/10 (non-Pro/SE/Elite), Wolf Warrior 11 Plus and X Plus.
AU$77.27
")
Zoom XTECH HB-100 2-Piston Semi-Hydraulic Brake Calliper (mechanical/cable)
Zoom XTECH HB-100 2-Piston Semi-Hydraulic Brake Calliper (mechanical/cable)
Kaabo factory stock calliper on Mantis 10 Duo models.
AU$41.82
Powered by Lightspeed
Display prices in:AUD